Showing posts with label Cheesecake. Show all posts

Tuesday, February 14, 2012

Brown Sugar-Apple Cheesecake

Behold, the brown sugar-apple cheesecake.


Had I known how good this cheesecake is four years ago when I bought Baking From My Home to Yours, I wouldn't have waited until now to make it.

I am not a cheesecake lover. Cheesecake strikes me as overly heavy and rich, and I'm just not a fan. Or at least I wasn't until I made my first Dorie cheesecake. Her technique involves beating the cream cheese for quite a long time, which makes it light (and eliminates the chunks I used to get). This recipe is a little more complicated, but worth it.

The batter was so yummy. The apples put off such a lovely juice when I sautéed them that I almost cried when I poured it down the sink without thinking. I wished I'd made toast and enjoyed every drop of that elixir. This cheesecake was insanely popular with my tasters at work.

Nancy and Margaret are also working at a feverish pace to get through the remaining recipes in Baking from My Home to Yours. You can find Nancy's post here and Margaret's here.

Brown Sugar-Apple Cheesecake - adapted from Baking From My Home to Yours
Printer-friendly recipe

For the Crust
Scant 2 cups graham cracker crumbs
2 tablespoons light brown sugar
½ teaspoons ground cinnamon (optional)
½ stick (4 tablespoons) unsalted butter, melted

For the Apples
½ stick (4 tablespoons) unsalted butter
3 large Golden Delicious or Fuji apples, peeled, cored and cut into eighths
2 tablespoons (packed) light brown sugar

For the Filling
1½ pounds cream cheese, at room temperature
¾ cup (packed) light brown sugar
6 tablespoons sugar
3 tablespoons apple cider (I used apple juice)
2 teaspoons pure vanilla extract
2 teaspoons ground cinnamon
3 large eggs
¾ cup sour cream
⅓ cup heavy cream

Apple jelly, for glazing, or confectioner’s sugar, for dusting (optional)

To Make the Crust:
Butter the bottom and sides of a 10-inch springform pan.

Put the gingersnaps in a food processor and whir until you have crumbs; you should have a scant 2 cups. (If you are using graham cracker crumbs, just put them in the food processor.) Pulse in the sugar and cinnamon, if you’re using it, then pour over the melted butter and pulse until the crumbs are moistened. Turn the crumbs into the springform pan and, using your fingertips, firmly press them evenly over the bottom and up the sides of the pan as far as they’ll go. Put the pan in the freezer while you preheat the oven. (The crust can be covered and frozen for up to 2 months.)

Center a rack in the oven and preheat the oven to 350 degrees F.

Remove the pan from the freezer and wrap the bottom tightly in aluminum foil, going up the sides. Place the pan on a baking sheet and bake for 10 minutes, or until the crust is set and lightly browned. Transfer to a rack to cool while you make the apples and the filling. Leave the oven at 350 degrees F.

To Make the Apples:
Melt 2 tablespoons of the butter in a large nonstick skillet over medium-high heat. When the foam subsides, toss in half of the apple slices and cook, turning once, until they are golden brown, about 3 minutes. Sprinkle the apples with 1 tablespoon of the sugar and cook them, turning, just until coated, another minute or so. Scrape the apples onto a plate, wipe out the skillet and repeat with the remaining apples. Let the apples cool while you make the filling.

Getting Ready to Bake:
Have a roasting pan large enough to hold the springform pan at hand. Put a kettle of water on to boil.

To Make the Filling:
Working with a stand mixer, preferably fitted with a paddle attachment, or with a hand mixer in a large bowl, beat the cream cheese on medium speed, scraping down the bowl often, for about 4 minutes, or until it is velvety smooth. Add the sugars and beat for another 2 minutes. Beat in the cider, vanilla, and cinnamon. Reduce the speed to low and beat in the eggs one by one, beating for 1 minute after each egg goes in. Finally, beat in the sour cream and heavy cream, beating just until the batter is smooth.

Pour about one third of the batter into the baked crust. Drain the apples by lifting them off the plate with a slotted spoon or spatula, and spoon them into the pan. Cover with the remaining batter and, if needed, jiggle the pan to even the top. Place the springform pan in the roasting pan and pour in enough boiling water to come halfway up the sides of the springform pan.

Bake the cheesecake for 1 hour and 30 to 45 minutes, covering the cake loosely with a foil tent at the 45-minute mark. The cake will rise evenly and crack around the edges, and it should be fully set except, possibly, in the very center-if the center shimmies, that’s just fine. Gently transfer the cake, still in the pan, to a cooling rack and let it cool to room temperature, then refrigerate it for at least 6 hours; overnight would be better.

Run a blunt knife around the edges of the pan to loosen the crust, open the pan’s latch and release and remove the sides.

Sunday, December 18, 2011

Caramel Cheesecake Bars


I know what you're thinking...and yes, we did just have cheesecake bars recently, but these are as different from the lemon cheesecake bars as a dog is from a cat. Both have four legs, fur and can be domesticated to varying extents. But that's where the similarity ends. And so it is with these cheesecake bars.

Like so many good things I make, I found these on Tracey's Culinary Adventures.


And also like so many things I find on Tracey's website, the recipe was in a cookbook I own. For those of you who mastered the lemon cheesecake bars, these will be very familiar. I really like Alice's crust: it's almost a batter you spread in the pan...no fussy crust, no stress.

They're so easy, especially if you have the caramel already made, and although cheesecake isn't a favorite, these were otherworldly due to the salted caramel swirl, in spite of being a tiny bit overdone. Next time, I'll probably use my own caramel recipe (you can find my caramel 101 here) and add flour de del to it.

Caramel Cheesecake Bars - adapted from Chewy Gooey Crispy Crunchy thanks to Tracey
Printer-friendly recipe
Crust
14 tablespoons unsalted butter, melted and still warm
1/2 cup (3.5 oz) sugar
2 teaspoons vanilla extract
3/8 teaspoon salt
2 cups (9 oz) all-purpose flour

Filling
3/4 cup caramel sauce (recipe below)
1 1/2 lbs cream cheese, at room temperature
1/4 cup (1.75 oz) sugar
1 1/2 teaspoons vanilla extract
2 large eggs, at room temperature

To make the crust: Preheat oven to 350 F with a rack in the lower third of the oven. Line a 13x9 baking pan with parchment paper, leaving an overhang so you can lift the bars out after they've baked.

Combine the melted butter, sugar, vanilla and salt in a medium bowl. Stir in the flour until just incorporated - the mixture will be soft, that's fine. Transfer the mixture to the prepared baking pan and press into an even layer on the bottom of the pan. Bake for 20-25 minutes, or until the crust is golden brown. Let cool completely. Turn the oven down to 325 F.

To make the filling: In the bowl of a stand mixer fitted with the paddle attachment, beat the cream cheese on medium speed until smooth, about 30 seconds. Scrape down the sides of the bowl then add the sugar and vanilla, beating until smooth and creamy, about 1-2 minutes. Add the eggs, one at a time, beating just until incorporated and scraping down the sides of the bowl in between. Transfer 2 tablespoons of this batter to the 3/4 cup of caramel sauce and stir to incorporate. Pour the remaining cheesecake batter over the cooled crust and spread evenly.

Dollop the caramel sauce mixture over the filling. Use a toothpick to gently marble the caramel, being careful not to scrape the crust while you are doing it. Bake for 20-25 minutes, or until the edges are puffed and the center is just barely set.

Transfer the pan to a cooling rack and let come to room temperature. Cover and refrigerate for at least 4 hours, but preferably 24. Use the parchment sling to lift the bars out of the pan and transfer to a cutting board. Cut into squares with a long sharp knife. The bars can be refrigerated in an airtight container for up to 4 days.

Salted Caramel Sauce - adapted from Cook's Illustrated

2 cups sugar
1 cup heavy cream
2 tablespoons cold unsalted butter
1 teaspoon flour de del or grey sea salt

Add 1 cup of water to a 2-qt saucepan. Gently add the sugar to the center of the pot - it will mound, that's fine. Cover the pot and bring to a boil over high heat. Once boiling, uncover the pot and insert a candy thermometer. Continue cooking until the mixture registers 300 F and is just starting to develop some color, about 15 minutes. Reduce heat under the pot to medium and cook until the syrup is amber and registers 350 F on the thermometer, about another 5 minutes. Meanwhile, pour the cream into a small saucepan and bring to a simmer. If it simmers before the syrup is ready, just take it off the heat and set aside.

Remove the caramel from the heat and add about 1/4 of the warm cream to the pot. It will bubble furiously so be careful. Once the bubbling subsides, add the remaining cream. When it stops bubbling, whisk gently to incorporate fully. Add the butter and the salt and whisk to combine.

Set aside 3/4 cup of the salted caramel sauce for the cheesecake bars. The remainder can be refrigerated for up to 1 month.

Makes about 2 cups

Thursday, November 3, 2011

Lemon Cheesecake Bars


My recent windfall of Meyer lemons paid another dividend when I decided to adapt a recipe I originally saw on Tracey's Culinary Adventures. Tracey made hers with caramel but they were screaming to me to be the destination for my leftover lemon curd.

The recipe is from Alice Medrich's book Chewy Gooey Crispy Crunchy, which I own, but as with so many of my cookbooks I needed Tracey to point me to the right recipe. This is one of my favorite crust recipes, more like a thick batter that you spread in the pan rather than struggling with crumbly pastry. I use a piece of plastic wrap to tease it into place.

For me, cheesecake and lemon are a natural together as so many classic cheesecake recipes call for lemon zest. These bars, with their easy crust and no nonsense filling, are super simple. With the lemon curd swirled in they were delicious. The lemon was a lovely surprise in the creamy filling, with the crisp, buttery crust coming together in the perfect bite.

Lemon Cheesecake Bars - adapted from Chewy Gooey Crispy Crunchy, thanks to Tracey
Printer-friendly recipe

Crust
14 tablespoons unsalted butter, melted and still warm
1/2 cup (3.5 oz) sugar
2 teaspoons vanilla extract
3/8 teaspoon salt
2 cups (9 oz) all-purpose flour

Filling
1 cup lemon curd (homemade or jarred)
1 1/2 lbs cream cheese, at room temperature
1/4 cup (1.75 oz) sugar
1 1/2 teaspoons vanilla extract
1/8 teaspoon Fiore di Sicilia (optional)
2 large eggs, at room temperature

To make the crust: Preheat oven to 350 F with a rack in the lower third of the oven. Line a 13x9 baking pan with parchment paper or foil, leaving an overhang so you can lift the bars out after they've baked. If using foil, spray it with nonstick cooking spray.

Combine the melted butter, sugar, vanilla and salt in a medium bowl. Stir in the flour until just incorporated - the mixture will be soft, that's fine. Transfer the mixture to the prepared baking pan and press into an even layer on the bottom of the pan. Bake for 20-25 minutes, or until the crust is golden brown. Let cool completely. Turn the oven down to 325 F.

In the bowl of a stand mixer fitted with the paddle attachment, beat the cream cheese on medium speed until smooth, about 30 seconds. Scrape down the sides of the bowl then add the sugar and vanilla, beating until smooth and creamy, about 1-2 minutes. Add the eggs, one at a time, beating just until incorporated and scraping down the sides of the bowl in between. Pour the cheesecake batter over the cooled crust and spread evenly.

Dollop the lemon curd over the filling. Use a knife to gently swirl the lemon curd into the cheesecake mixture. Bake for 20-25 minutes, or until the edges are puffed and the center is just barely set.

Transfer the pan to a cooling rack and let come to room temperature. Cover and refrigerate for at least 4 hours, but preferably 24. Use the sling to lift the bars out of the pan and transfer to a cutting board. Cut into squares with a long sharp knife. The bars can be refrigerated in an airtight container for up to 4 days. Mine weren't in an airtight container and they cracked but were still delicious.

Sunday, January 24, 2010

Sweet Melissa Sundays - Black Bottom Brownies


I've said it before: I love chocolate and I love cheesecake, but I don't love chocolate cheesecake. Would this week's Sweet Melissa Sundays recipe, Black Bottom Brownies, change that?

Fortunately, my copy of The Sweet Melissa Baking Book arrived this week so I wasn't squinting at the recipe preview on Amazon (and many thanks to my fellow SMS bakers Raeann and Hanaâ who offered to send me the recipe if the cookbook hadn't arrived). The recipe starts with a deep, dark brownie layer, with a thick and creamy cheesecake layer smoothed over it. Then came the part that left me scratching my head...scatter 2 cups of chocolate chips over the top of the cheesecake. It was probably done 5-10 minutes before I realized it and yanked it out of the oven, so mine had a little more color than I would have liked. After cooling, it went off to the fridge before cutting.


While this didn't change my mind about the chocolate/cheesecake combination, it was very popular at work. If I were to make it again, I'd make some changes, like shifting the chocolate chips to the brownie layer and maybe flavoring the cheesecake with espresso or extra vanilla.

Many thanks to Cynthia of Bakingtherapist's Blog for hosting this week. If you'd like the recipe, visit Cynthia or better yet, buy the book. It has dozens of sweet and delightful recipes like this one.

Tuesday, December 29, 2009

TWD - Low and Luscious Chocolate Cheesecake


Margaret of Tea and Scones chose this week's Tuesdays with Dorie recipe, Low and Luscious Chocolate Cheesecake. I was excited about this one because a.) it's chocolate, and b.) it's cheesecake.

I didn't used to like cheesecake (the same could be said about burgers, and I now love them, too), but that was before Dorie Greenspan's Tall and Creamy Cheesecake. It won me over (and most everyone at work--they love that cheesecake so much that when I ask what they'd like me to make, it's always the cheesecake).

This chocolate cheesecake is so easy to make, and so low maintenance it doesn't even require a water bath. I made it as written, and baking it was completely uneventful. Yay for the absence of trauma!

I discovered that although I love chocolate and I love cheesecake, chocolate cheesecake doesn't make my heart beat faster. I like my chocolate chocolatier and my cheesecake cheesecakier (is that even a word?) And though my coworkers liked it, and ate it, they much prefer the Tall and Creamy.

Can you believe that the photo at the top of the post is the only one I have of this cheesecake?? But I have dozens of pictures like this one...


Thanks for an easy, tasty pick, Margaret!

Monday, November 30, 2009

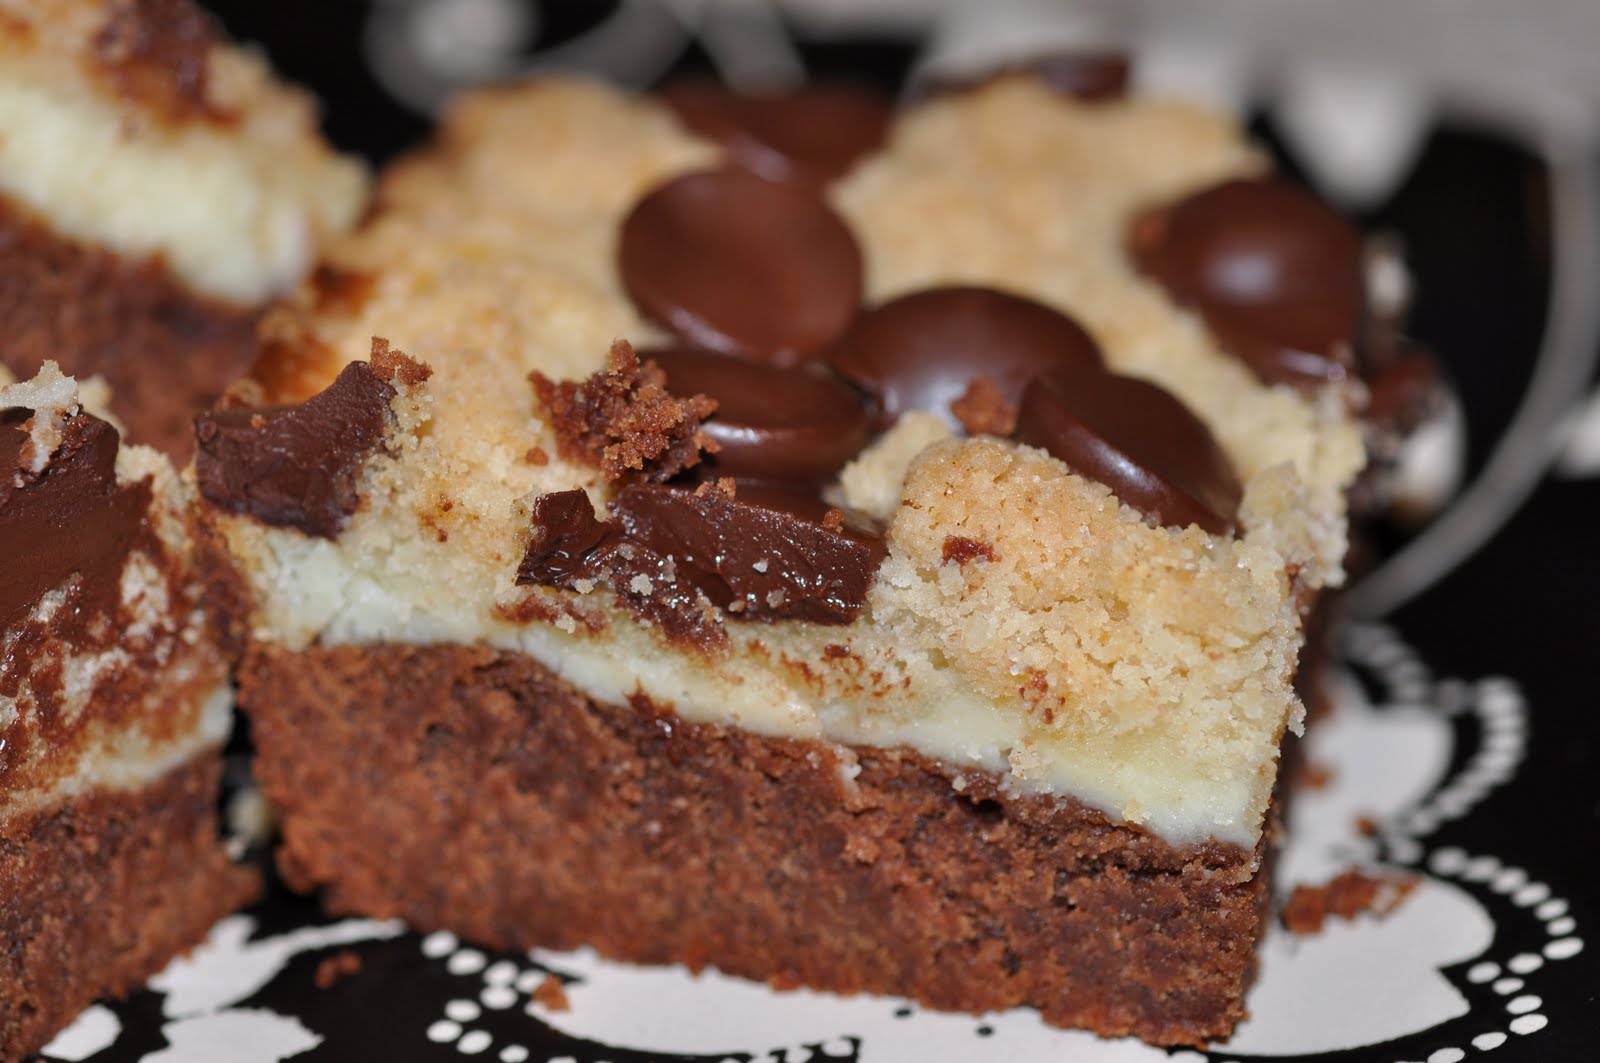
Cheesecake Streusel Brownies

When the nice folks at C&H Sugar contacted me and asked if I'd like to make a recipe from their website and blog about it, I only thought about it for a minute or two. Even though I have never accepted an offer before to blog about a product, I use C&H. In return, they gave me a $20 gift card to use for my baking habit. Sweet! (no pun intended!)

The hard part of this was choosing a recipe. I printed off six recipes in about 5 minutes of looking, and settled on Cheesecake Streusel Brownies. They had two things going for them: they looked easy and they had chocolate in them. I vowed to remain true to the recipe, and I was mostly successful, though I chickened out at the last minute and subbed bittersweet chocolate chips for the topping.

The recipe starts with the streusel/brownie layers. You make the streusel, set some of it aside and use the rest to make the brownie layer. The recipe was very easy, and because the cheesecake layer gets covered in streusel and then chocolate chips, I didn't have to stress about little bits of the brownie layer that got stirred up when spreading the cheesecake. Not that I had a problem with that. No, not me.

The part that perplexed me was the layering: brownies on the bottom (sure), then cheesecake, (fine), streusel (makes sense), then chocolate chips. What? Chocolate chips on the top?? I kept muttering "I don't see how this is going to work" as I sprinkled the chocolate chips on top. As it baked, the chocolate chips melted slightly and formed soft little chocolate spots on the top.


These smelled fantastic as they baked so I didn't let them cool entirely before cutting one to sample. You definitely want to wait until they're cool before slicing them because they are a little crumbly when warm but slice cleanly when cooled. The cheesecake and brownie layers were delicious together, but the streusel really made them better. Next time, I'd add a little salt to the streusel and brownie, change the chocolate in the brownie to bittersweet and use semi-sweet for the topping. These would also be terrific with toffee bits in the brownies or walnuts in the streusel.

Thanks to the folks at C&H for including me in their holiday blogging event!

Tuesday, December 30, 2008

TWD - Tall and Creamy Cheesecake

This week's Tuesdays with Dorie recipe, Tall and Creamy Cheesecake, was chosen by Anne at Anne Strawberry. I was already a huge fan of Anne's blog so I was very excited to see what she would chose when it was her turn. Normally, cheesecake is not my favorite dessert. I usually find it too heavy and high cholesterol is an issue for both M and I. If I'm going to rocket my LDL up a notch, I prefer to do it with decadent cookies like these or these. But Anne chose this one and, on top of that, I missed so many weeks of TWD while the kitchen was being renovated that I wanted to do this one.

I opted to make it plain (the "basic" option Dorie offers). The recipe gives the baker the flexibility to use sour cream, heavy cream or a combination. Many of the other bakers opted for sour cream or a combination as they wanted the tanginess. I figured the cream cheese would give me a nice tang and opted for all heavy cream. The recipe was the easiest I've ever made. The crust (graham cracker) was a cinch, and the filling (which Dorie instructs should be beaten a long time) was a snap. My cheesecake lightly browned on top but did not crack. I cooled completely before putting it in the refrigerator overnight.

The verdict? We LOVED this cheesecake! It was creamy and rich, but without the clumps of fat sticking to the roof of your mouth like denser cheesecake recipes (sorry to be gross!) It was a huge hit at work, with many people saying it was better than Cheesecake Factory, and others saying comparing this cheesecake to CF was an insult to my cheesecake! I plan to make this one again, like, soon. I'm thinking about making it espresso flavored with a chocolate cookie crust.

Thanks to Anne for choosing this recipe and opening my eyes to how great cheesecake can be. If you'd like the recipe, I'd encourage you to pick up the book we're all baking from Baking: From My Home to Yours by Dorie Greenspan, or you can get the recipe on Anne's website here. Check out what the other TWD bakers did here. Even though TWD was closed to new bakers on 10/31/08, Laurie has generously opened it up to new bakers until 1/1/09 in honor of TWD's one year anniversary. If you'd like to join us, here's how you do it.