Cathy, this one's for you.

OK, let's get started. Start with a cup of sugar (or two cups or 3/4 of a cup, or ten cups). Totally up to you how much you want to make. Smaller quantities burn easily, so don't take it below 1/2 cup of sugar.

This is your tool of choice
Heat the cup of sugar in a medium saucepan (I used a small one, here, but as you will see later, that makes it a little exciting). If you're going with ten cups, size up on the pan. Before you begin, have an equal amount of heavy cream near the stove.


Melting oh-so-slightly around the edges
Can you tell what I'm making?

Use medium-low heat at first, and as the sugar starts melting around the edges, stir it up. You don't need to stir constantly at first, but definitely don't leave the kitchen. After all, you're cooking sugar. It demands respect.

The sugar will get chunky, then melt into a light caramel chunky liquid. Oops, I said "caramel," ruining the surprise.

Stir more frequently as the melting is progressing (which will happen quickly depending on how hot your stove is).

The chunks will melt away. Keep stirring, and wait until the sugar gets deep brown.

It may foam on the surface, but use your stirring to peek into the caramel to determine its color.


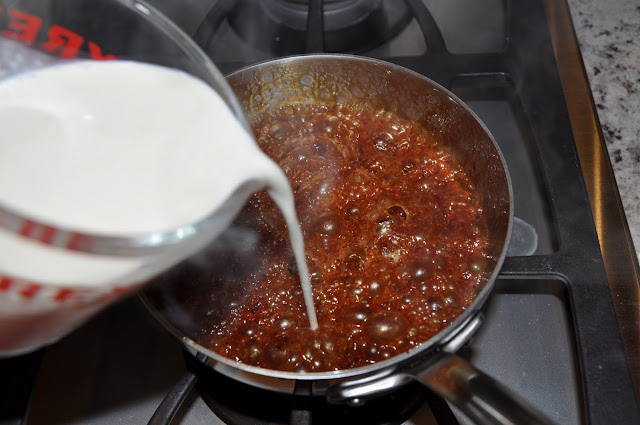
Once it's deep brown, remove the pan from the heat and CAREFULLY pour in the whipping cream.

The mixture will fiercely bubble up and may seize.

This boiled up dangerously close to the top of the (too small) pan, so I put the camera down to make sure I didn't need to grab the fire extinguisher.
No worries! Return it to the heat, and stir (with your fork or with a heat proof spatula) until the caramel is completely smooth.


Pour into a heatproof container (like a measuring cup or this milk bottle). Cool on the counter for a bit before refrigerating.

That's it, you've made caramel! It's an aggressive, bitter caramel, so if you like a mellower caramel, don't take the sugar to the edge of burning like I do. When you're trying it for the first time, don't worry if you don't let it get brown enough. With time, your sugar confidence will grow and you'll learn how to take it to the edge to get that wonderful bitter flavor. This is an easy recipe, and doesn't require brushing the sides of the pan with water as sugar crystals don't form. The possibilities are endless, but we love it on vanilla ice cream. It's equally good served with cheesecake, profiteroles, or if put in a squeeze bottle, you can use it to decorate dessert plates (not that I do that).
And clean up? A breeze. Let your screaming hot pan cool off, then let it sit with water in it for a bit. The caramel melts away and the pan is easily cleaned with no sticky mess.
9 comments:
Yum...there's nothing better than warm caramel sauce!
De-lish! This would be good drizzled over the TWD apple turnovers!
Geez - where did I just see that made? Oh I know! In my own kitchen - for the TWD tart at the end of the month!
Great step by step photos - she will love this!
Hitting the sauce...Love it.
Great pictures. I wish I had some of that warm caramel to go over some ice cream!
Love your progress shots, whenever I make caramel I am so anxious since it almost always burns on me that I can never get pictures.
Wow, I love caramel but have never made it before. Thanks for the step by step pictures, I'll have to try it! =)
YUM. I need to make some.
I love your little sauce tutorials! I printed out the one for hot fudge, and I may do the same for this one. I love, LOVE caramel, but it makes me nervous to make it. I'll keep trying, though!
This step by step guide is so helpful!! I just try making caramel for the first time this weekend and burnt the heck out of it. It was completely inedible! I am going to try your way next!
Post a Comment