Friday, May 27, 2011

My Dirty Little Secret

Although I'm basically a person who thrives in a neat, organized environment, that's not always how my world looks. In the past year, I've made a concerted effort to tame my propensity for letting a little clutter gather. My desk at work has been organized (and completely free of paper each night before I leave) since July. The kitchen counters have been clear and the sink has been free of dishes for a couple of months. Even after Thanksgiving's pie production, I cleaned the kitchen completely before I fell into bed.

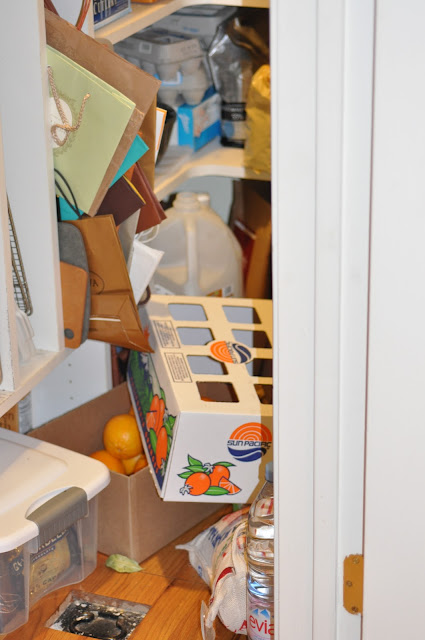
This kind of self discipline isn't easy for me but it reduces my stress level and makes it easier to keep the rest of my world in check. And so it is that this area of my home is still a train wreck. Behold, my pantry (think dramatic horror movie music):


Well, this is what it looked like a few months ago. I've been slowly whittling away at it, taking boxes to charity and trying to use up what I have before buying more. I now run out of the things that I used to buy multiples of, but it is helping me reclaim my pantry and my sanity. In time, it won't be a dirty little secret anymore, and I can once again enjoy opening the pantry door to grab ingredients for baking.

I never appreciated how much my surroundings impact my mood before I started cleaning off my desk before leaving work each night. I find I am more productive because the open space on my desk encourages me to work rather than seeing the mounting pile of unfinished work and feeling hopeless. It's that epiphany I hope to carry to other areas of my life (home office desk - check; kitchen counters - check).

What area of your home is getting you down? Could you spend an hour or two this weekend to recapture that closet or desk and reclaim your inner peace? I encourage you to do it. It has helped me to be focused and calm at work, no matter what is swirling around me, and I am already reaping the rewards at home as well. Give it a try!

Thursday, May 26, 2011

Chocolate Cupcakes with Orange Cream Cheese Frosting


Take the deepest, darkest chocolate flavor. Add a soupçon of coffee. Crown with cream cheese frosting with a hint of orange zest. Devour.

Only one thing could unseat a coworker's favorite birthday treat and it was these cupcakes. The cupcake is moist and flavorful and the frosting is lightly orange, sweet enough but not cloyingly. You can make them a day or two in advance without compromising the texture, just store them in a sealed container in the fridge.

They're easy to make but the batter is exceedingly thin, so the first time I made them, I poured the batter into a large measuring cup. That was fine, but my measuring cup dripped all over the muffin tins. The second time I made them I experimented with using a piping bag. This is what happened:


Maybe that wasn't the way to go.

Chocolate Cupcakes - adapted from Ina Garten, inspired by Jamie at My Baking Addiction
Printer friendly recipe
Makes 24 cupcakes

1 3/4 cups/245 grams all-purpose flour
2 cups/190 grams sugar
3/4 cups/72 grams unsweetened cocoa powder
2 teaspoons baking soda
1 teaspoon baking powder
1 teaspoon kosher salt
1 cup buttermilk, shaken
1/2 cup vegetable oil
2 large eggs, at room temperature
2 teaspoons vanilla extract
1 cup freshly brewed hot coffee

Preheat oven to 350 degrees. Line standard muffin tins with paper liners; set aside.

Sift the flour, sugar, cocoa, baking soda, baking powder, and salt into the bowl of an electric mixer fitted with a paddle attachment and mix on low speed until combined. In a 2 cup measure, combine the buttermilk, oil, eggs, and vanilla and stir with a fork to blend. With the mixer on the lowest speed (I use the Stir speed on my KitchenAid), slowly add the wet ingredients to the dry. With mixer still on the  lowest setting, add the coffee and stir just to combine, scraping the bottom of the bowl with a rubber spatula. The batter will be very thin. Don't worry if you have a few lumps.

Using a large piping bag or measuring cup, fill the muffin wells 2/3 full. Bake for 18 to 22 minutes, or until a cake tester comes out clean. Cool in the pans for 10 minutes, then remove to a cooling rack and cool completely.

Orange Cream Cheese Frosting - adapted from My Baking Addiction

16 ounces cream cheese, room temperature
zest of one large orange
9 tablespoons/4 1/2 ounces unsalted butter, room temperature
1 1/2 pounds confectioners’ sugar
1 teaspoon pure vanilla extract
1/4 teaspoon Fiori di Sicilia (optional but soo good)

In a the bowl of a stand mixer fitted with the paddle attachment, beat the softened cream cheese at medium speed for about 3 minutes. Add the softened butter, orange zest and beat until well combined, about 2 minutes. 

With the mixer on low, gradually add the powdered sugar until thoroughly incorporated and smooth. Add the extracts and mix to combine.
Put the frosting in a piping bag fitted with a star tip (or use a knife or small offset spatula) to swirl frosting on each cupcake. Store cupcakes in a sealed container in the refrigerator. Remove to room temperature 30-45 minutes before serving.

Tuesday, May 24, 2011

Oatmeal Cinnamon Scones


These days, when I flip through my copy of Baking From My Home to Yours I think, I've made that, this one was good, I need to make this one again, or I had to skip this one but I really want to make it soon.

There aren't that many pages left that have recipes we haven't made yet for Tuesdays with Dorie and on some days that makes me sad but on other days excited. Excited for the ones we have left and sad because Dorie's book and this group have changed my life, and by the end of the year we will be done with the book. I have formed so many close friendships and let loose my inner baker. I get endless rewards from baking, blogging and testing my limits through this group. I will never forget the fear I felt before making the coconut-roasted pineapple dacquoise and the euphoria I felt when it was completed. That post brought me my first comment from Dorie, and words can't express how meaningful it was for me.

There are still times I don't listen to my instincts and this week was one of them. My scones were just this side of burned. Yes, I admit I didn't watch my scones (hard to do when you're in the shower) and they baked up into crispy critters. But my coworkers still enjoyed them (maple butter helped moisten them up). Although they were good, I think they would have been a lot better if I took them out of the oven two minutes earlier.

Patricia of Life with a Whisk chose this week's recipe for us. I was very grateful for an easy and adaptable one. Here's what I did:
  • I used cinnamon instead of nutmeg, and it was perfect.
  • Scones don't like to be handled--shaggy dough is preferable. If the dough is cohesive, your scones will be less flaky and light.
  • I made one giant disk of dough instead of two, laid it on parchment instead of flouring the counter and cut it on the parchment before lifting the scones onto a prepared baking sheet. I liked the easier clean up, but this was a very moist dough and needed a little extra flour. My suggestion: go with the parchment, but give it a good dusting of flour.
  • I cut my scones a little thicker than the recipe called for, which is good since they were a little overdone. 
  • Make sure you check your scones early. I checked them one minute before they were supposed to be done and it was already too late.
Thanks to Patricia for hosting this week. If you'd like the recipe, Patricia will have it for you here. And if you want to see what the other bakers thought, you can find them here.

Thursday, May 19, 2011

Chocolate Sour Cream Bundt Cake


When I read this post from my buddy Di, I new I had to both buy the pan and make the cake. Di proclaimed it moist and delicious and that was enough to send me to the kitchen.

This pan (the Nordic Ware heritage bundt pan) is the perfect pan for this cake! The exaggerated sharp peaks get extra crunchy (though not in a bad way) which is a striking contrast with the moist interior. I was glad I shared this one with my coworkers or it could have gotten ugly around here.

Chocolate Sour Cream Bundt Cake
Printer friendly recipe
1 tablespoon butter, melted
1 tablespoon cocoa
3/4 cup natural cocoa (not Dutch-processed, 2 1/4 ounces)
6 ounces bittersweet chocolate, chopped
1 teaspoon instant espresso powder (optional)
3/4 cup water (boiling)
1 cup sour cream, room temperature
1 3/4 cups unbleached all-purpose flour (8 3/4 ounces)
1 teaspoon salt
1 teaspoon baking soda
12 tablespoons unsalted butter, room temperature
2 cups packed light brown sugar (14 ounces)
1 tablespoon vanilla extract
5 large eggs, room temperature
confectioners' sugar, for dusting (optional)

Using a pastry brush, coat all interior surfaces of a 12-cup Bundt pan with the butter. Dust with the cocoa, being sure to coat the entire pan thoroughly. Adjust oven rack to lower-middle position; preheat oven to 350°F.


Combine cocoa, chocolate, and espresso powder in a medium heatproof bowl; pour boiling water over and whisk until smooth. Cool to room temperature; whisk in the sour cream. In another bowl combine the flour, salt, and baking soda and whisk to combine.


In a standing mixer fitted with the flat beater, beat butter, sugar, and vanilla on medium-high speed until pale and fluffy, about 3 minutes. Reduce speed to medium and add the eggs one at a time, mixing for 30 seconds after each addition and scraping down bowl with rubber spatula after each addition. Reduce speed to medium-low (batter may appear curdled); add about one third of flour mixture and half of chocolate/sour cream mixture and mix until just incorporated, about 20 seconds. Scrape down the bowl and repeat using half of remaining flour mixture and all of the remaining chocolate mixture. Add the remaining flour mixture and beat until just incorporated, about 10 seconds. Scrape bowl and mix on medium-low speed until the batter is thoroughly combined, about 30 seconds.


Pour the batter into the prepared Bundt pan. Bake until a toothpick inserted in the center comes out with few crumbs attached, 45 to 50 minutes. Cool in the pan 10 minutes, then invert cake onto a wire rack with a piece of parchment on it; cool to room temperature. Dust with confectioners' sugar if desired before serving.

Tuesday, May 17, 2011

Maple Cornmeal Biscuits


Some months I make all of the Tuesdays with Dorie recipes for the month within a week of when they're announced, giving me the luxury of time to write my posts, comment on my friends blogs and generally enjoy the process.

These days, not so much. I've been working a ton (lots of 8 and 9 PM nights) and generally feeling like I'm living one of those nightmares where you run faster and faster but seemingly run in place, unable to escape the monster. It's not even my "busy" time of year yet, that time when we're closing the books for the year and getting ready for the audit, and getting through the audit, and the year-end reporting, yadda yadda.

When things are a pressure cooker get busy at work, I bake. My coworkers call it stress baking and while they are simpatico about my palpable stress, they've started tremulously asking the question "So, you're working a ton. When does the stress baking start?" For while they wouldn't wish my year-end (that's June 30th for us) workload on anyone, they don't mind that I blow off steam by getting out the flour, butter, sugar, eggs and frequently chocolate.

Let me say I am extraordinarily lucky to work with a great group of people who whole-heartedly embrace my baking. I never hear complaints. In my last job, I was confronted in the elevator by a woman who found baked goods irresistible and really wanted me to stop. So I appreciate having an audience who eats it all, without complaint, and gives me good feedback to boot.

So when the stress baking question started surfacing, I resolved to bake more (hard to do when you're getting home at 9:30 and going back to work at 8-ish). Fortunately, the May TWD recipes had been announced and they were almost all easy, portable and suitable for breakfast.

I'm dubious about recipes that call for cornmeal if it's a departure from the norm, so I was a little wary about this one. In my pre-coffee stupor, I messed up measuring the wet ingredients and added too much maple syrup. My batter was much wetter than normal, but I went with it. It turned out just fine as the biscuits were moist, tender, flakey and delicious. I made a little maple butter to serve with them and that made the butter lovers happy.

I can't say how these keep since they disappeared in the blink of an eye. Like any biscuit, I think they should be consumed while still warm from the oven, and they taste extra yummy when shared with people you love.

Lindsay from A Little Something...Sweet is our host this week. I can't thank Lindsay enough for picking something easy and delicious to get this year's stress baking off on the right foot. If you're looking for a foolproof spin on the classic biscuit, Lindsay will have the recipe for you here.

Sunday, May 15, 2011

Browniepalooza Day 5 - Sweet and Salty Brownies


Sorry to say, we've reached the last day of Browniepalooza, delayed a bit due to the Blogger outage, but I'm not sad. Nope, not sad at all because I have one of these

Yes, it's the sweet and salty brownie that won my personal tasting. I bought the Baked Explorations cookbook so I could have this recipe, and you should too. In fact, I'm not going to give you the recipe so you'll go out and buy this cookbook. Unless that's not in your budget. In that case, you can find the recipe here.

For all of us who love the sweet and salty flavor profile, these are a revelation. There is a layer of salty caramel, but it mostly melts into the brownie, making it moist, fudgy, sweet, caramelly. Then there is the coarse sugar and fleur de sel sprinkled on the top right after they come out of the oven.

A few observations:
  • If your brownie audience isn't in love with sweet and salty desserts, reduce the salt on top to just a light sprinkling, or none at all. The saltiness of the caramel won't be enough to make them wrinkle their noses.
  • The recipe counsels not spreading the caramel all the way to the side for fear it will burn. Au contraire. The caramel along the edge of the pan gets a little crispy/chewy and my tasters LOVED that part. Just make sure you line your pan with parchment (and I love that with parchment, there's no need to butter and flour the pan).
  • You can make the caramel several days in advance. Keep it in the fridge and let it sit out for an hour or so before using it.
  • I use my favorite Ghirardelli 60% bittersweet chips to make these. No chopping chocolate and I don't think a premium imported chocolate would add anything.
  • After making these several times, I think it's best to sprinkle on the coarse sugar right when they come out of the oven but the fleur de sel after slicing. The knife cuts can cause the salt to bunch up along the edges and that can be a little too much salt for some of us.
I know I can be prone to hyperbole, but these really are the best brownies I've had. Please try them, and give some of the others a chance, too. They are:


Browniepalooza was so much fun (really!) that I think I'll do it next year. Maybe you'll join me. I already have my eye on a couple of recipes that I missed on this go round, plus someone is always coming up with a new spin on our old favorite. So many brownies, so worthy, that one week hardly seems enough!

Thursday, May 12, 2011

Browniepalooza Day 4 - Browned Butter Brownies with Walnuts


We're celebrating Browniepalooza this week at Lethally Delicious. Yes, it's a made up holiday, but I believe brownies deserve their own week in the spotlight.

Today, I give you the brown butter brownie from the February 2011 cover of Bon Appetit. If you've done the rounds in the blogiverse you've probably seen them, and the feedback is wildly positive. The recipe is from Alice Medrich, whom I love love love, and the brownies have the taste of a classic brownie, but with a tiny, subtle twist. You can't figure out what it is, so you eat another, and another and another... Brownie bliss. No shame. No remorse. Make another batch and do it again. I won't judge.

These had several things to recommend them. Browned butter, chocolate and nuts, specifically walnuts. Walnuts aren't my favorite but I went with it.

Ever since I read the Cook's Illustrated tip for putting nuts ON the brownie batter (they toast in the oven and get crunchy rather than getting wet in the batter), that's how I've done it. But I made these exactly as the recipe stated, including the nuts, and was pleasantly surprised that the nuts retained their crunch.

Brown Butter Brownies with Walnuts (adapted from Bon Appetit)

20 tablespoons unsalted butter, in chunks (it's faster with room temperature butter)
2 1/2 cups sugar
1 1/2 cup natural unsweetened cocoa powder (spooned into cup to measure, then leveled)
4 teaspoons water
2 teaspoons vanilla extract
1/2 teaspoon salt
4 large eggs, chilled
2/3 cup plus 2 tablespoons unbleached all purpose flour
2 cups walnut pieces

Position rack in bottom third of oven; preheat to 325°F. Lightly spray a 13x9" metal baking pan with cooking spray then line with parchment paper, leaving an overhang if possible. Melt butter in a deep medium saucepan over medium heat. Continue cooking, stirring constantly with a heatproof spatula until butter stops foaming, browned bits form at bottom of pan, and butter smells nutty, about 8 minutes. Remove pan from the heat; immediately add the sugar, cocoa, 4 teaspoons water, the vanilla, and salt. Stir with your spatula until blended. Let cool for 5 minutes (mixture will still be hot). Add eggs to hot mixture 1 at a time, beating vigorously to blend after each addition. When mixture looks thick and shiny, add flour and stir until blended. Beat vigorously 60 strokes. Stir in nuts. Transfer batter to prepared pan.

Bake brownies until a toothpick inserted into center comes out almost clean (with a few moist crumbs attached), about 25 minutes. Cool in the pan on a rack. Using the parchment sling handle, lift brownies from pan and cut as desired.

Wednesday, May 11, 2011

Browniepalooza Day 3 - Cocoa Brownies


All this week we're having Browniepalooza at Lethally Delicious. Each day features a different brownie recipe, culminating with my favorite on Friday. The brownie that won the popular vote was featured yesterday. But I had a different favorite so stay tuned for the rest of the week to find out which one I loved best.

Today's brownie comes from an Alice Medrich recipe that I found on Smitten Kitchen. I could have found it in one of the many cookbooks of hers that I have, but I was at work when I was doing my brownie research (while eating my lunch...really!) Seeing the photos reminded me of the brownies she served at a demonstration she did back in March at Draeger's.

These brownies were delicious, very deeply chocolate, very unusual. The quality of your cocoa matters here as that is where your chocolate flavor is coming from. You could add nuts, but I think that would detract from the flavor and texture of the brownie. I second Deb's advice to refrigerate them after cooling in order to make them easily sliceable.

Best Cocoa Brownies (adapted from an Alice Medrich recipe spotted on Smitten Kitchen)

20 tablespoons (10 ounces or 280 grams) unsalted butter
2 1/2 cups (1 pound, 3 3/4 ounces/560 grams) sugar
1 3/4 cup (5 3/4 ounces/165 grams) unsweetened cocoa powder (I used Valrhona)
1/2 teaspoon salt
1 teaspoon pure vanilla extract
4 large eggs, cold
1 cup (130 grams/4 3/4 ounces) all-purpose flour

Position a rack in the lower third of the oven and preheat the oven to 325°F. Line a 13x9" (I used a quarter sheet pan and it was perfect) baking pan with parchment paper or foil, leaving an overhang.

Combine the butter, sugar, cocoa, and salt in a medium heatproof bowl and set the bowl in a wide skillet of barely simmering water. Stir occasionally until the butter is melted and the mixture is smooth and hot enough that you want to remove your finger fairly quickly after dipping it in. Remove the bowl from the skillet and set aside until the mixture is only warm, not hot. It will look fairly dodgy but it will even out once the rest of the ingredients are added.

Stir in the vanilla, then add the eggs one at a time, stirring vigorously after each one. When the batter looks thick, shiny, and well blended, add the flour and stir until you cannot see it any longer, then beat vigorously for 40 strokes with a wooden spoon or rubber spatula. Spread evenly in the lined pan.

Bake until a toothpick plunged into the center emerges slightly moist with batter, about 25 minutes. Let cool completely on a rack. (Deb refrigerates the brownies to ensure clean cuts.)

Lift up the ends of the parchment or foil liner, and transfer the brownies to a cutting board. Cut into squares.

Tuesday, May 10, 2011

Browniepalooza Day 2 - Triple Chocolate Brownies


It's Browniepalooza this week at Lethally Delicious. I'm trying a different brownie recipe each day, building up to my very favorite one on Friday. Wonder what it could be?

Today is a bit of a rerun. I've made these brownies hundreds of times, and this has been my go-to brownie recipe for years. In the five way tasting, this beat out all the other brownies on M's tasting sheet and it narrowly topped my favorite in a tasting at work. Maybe it's the toasty pecans on top, or the chocolate chips inside. Whatever it was, this brownie has its fans.

I make these with Ghirardelli 60% bittersweet chips. It's my favorite every day chocolate, and not even I dip into the expensive French chocolate when I make brownies.

Triple Chocolate Brownies
Printer friendly recipe

6 oz bittersweet chocolate, chopped (I use Ghirardelli 60% bittersweet chips)
2 oz unsweetened chocolate, chopped
12 tablespoons (1 1/2 sticks) unsalted butter
1 1/2 cups (10.2 ounces) sugar
2 teaspoons vanilla extract
4 large eggs
1 cup (5 oz) all-purpose flour
1 teaspoon salt
1 cup (6 ounces) semi-sweet chocolate chips
3/4 cup (3 1/2 ounces) chopped walnuts, pecans or almonds (optional)

Butter and flour a 13" x 9" pan and set aside. In a metal bowl, combine the butter, bittersweet and unsweetened chocolates and set it over a pan of simmering water. Stir until the chocolates and butter are melted and combined, then remove from the heat. Let the mixture cool until it is lukewarm, then stir in the sugar and the vanilla. Add the eggs one at a time, stirring until incorporated. Add the flour and the salt, stirring until just combined (a few flecks of flour are OK), then mix in the semi-sweet chips. Spread in the prepared pan, smooth the top and scatter the nuts over the top, pressing very lightly.

Bake at 350 for 25-30 minutes, until a tester comes out with crumbs adhering to it. Cool completely before cutting.

Brown Sugar Hazelnut Bundt Cake


A perfect bundt recipe is a good friend when one needs an easy dessert that looks a lot more special than the combination of butter, sugar, flour and eggs would seem.


I chose to leave out the fruit (pears and prunes) and go the nut route, so I used a stash of hazelnuts languishing in my pantry and hazelnut flour from the freezer. I swore "never again' as I was skinning the hazelnuts and chopping them (oh how they do love to roll around), but as soon as I tasted the finished cake, I forgot my oath. Moist, nutty, luxuriously tasty, this is one perfect bundt cake. It was perfect in spite of my efforts to screw it up...I forgot to add the chopped hazelnuts until I had put the cake in the oven. I immediately grabbed it, dumped the nuts on top, and swirled them in with a knife. I think I'll do it that way every time I make this cake as I didn't have any nuts sticking out to mar the beautiful crust.

The recipe comes from Baking From My Home to Yours by Dorie Greenspan, and was selected as this week's Tuesdays with Dorie recipe by my blogging buddy Peggy from Pantry Revisited. Peggy and I have several groups in common. She has a wonderful sense of humor and is a dear person besides. She'll have the recipe for you here. You can find out what the other bakers thought (many of whom made the original recipe with dried fruit) by checking them out here. Thanks, Peggy, this one was a home run!

Monday, May 9, 2011

Browniepalooza Day 1 - Palm Beach Brownies


It's Browniepalooza this week at Lethally Delicious. I'll have five different brownies for you to try, so plan to stop back every day to see what treat is in store. My favorite brownie will be on Friday. Hmm...wonder what it could be???

Palm Beach Brownies are from a Maida Heater recipe. I first learned of this recipe when my Twitter buddies were making Nick Malgieri's Florida Brownies from Bake! I didn't have Bake! so I looked for the recipe online. I didn't find it, but I did find the recipe it was based on, Maida Heater's Palm Beach Brownies.

This recipe uses unsweetened chocolate and a LOT of sugar, but it yields a brownie that is fall apart fudgy when warm but is transformed to a dense fudgy brownie when chilled. We liked the crunchy outer shell that encased the fudgy middle. This one had many fans (especially lovers of milk chocolate), but it was too sweet and not chocolaty enough for me so I forged on in my search for the quintessential brownie.

Palm Beach Brownies (adapted from Flora's Recipe Hideout, originally from Maida Heater)
Printer friendly recipe

8 ounces unsweetened chocolate
2 sticks unsalted butter
5 large eggs
2 teaspoons vanilla extract
1/4 teaspoon salt
1 teaspoon instant espresso powder
3 3/4 cups sugar
1 2/3 cups all-purpose flour

Adjust an oven rack in the lower third of the oven and preheat oven to 375 degrees. Line a 9x13" pan with parchment paper. Melt the chocolate and butter in heat proof bowl set over a saucepan with an inch or so of simmering water, stirring occasionally. When combined, remove from heat and set aside.

In the large bowl of an electric mixer, beat the eggs and the vanilla extract, salt, expresso powder and sugar at high speed for 10 minutes. On low speed, add the chocolate mixture and beat only until combined. Remove the bowl from the mixer and pour the batter into the prepared pan.

Bake for 35-40 minutes, turning the pan halfway through to insure even baking. When done the cake will have a firm crust but will appear underbaked when tested with a toothpick.

Remove the pan from the oven and cool completely on a rack. Remove the brownies from the pan and remove the parchment. Wrap well and refrigerate for a few hours or overnight before cutting into bars. Makes 32 brownies.

Tuesday, May 3, 2011

Chocolate Orange Marbled Loaf Cake


This week's Tuesdays with Dorie pick comes to us from Carol of The Bake More. This one was on my short list when it was my turn to pick the recipe, and I was eager to make it. Dorie gives us a basic marbled loaf cake recipe with multiple variations, and since we love chocolate and orange together, I knew which one I would make.

Not surprisingly, I used 70% cacao chocolate to get the biggest chocolate flavor, and it actually made the chocolate part of the dough quite stiff, so my swirling left a lot to be desired. I baked my loaf in my Nancy pan (click here to read the story behind my Nancy pan) and it was done in an hour. I loved the more slender shape of the loaf, and especially loved the dramatic crowning of the loaf.


I find many marbled loaf cakes to be dry, but this one was moist and delicious. The orange was the perfect foil to the chocolate. I served this one on its own, but it could be dressed up with a chocolate ganache, whipped cream, vanilla ice cream or sliced berries. It was an easy yet impressive cake to whip up. Dorie's other flavor combinations sound delicious, too, and the other TWD bakers loved the white chocolate mint combo (you can find out what they thought here).

Thanks to Carol for choosing this recipe for us to discover this week. It's a winner that I will make again and again. If you'd like to add it to your short list, Carol has the recipe for you here.